Dodge Journey: Module, power, rear blower motor
DESCRIPTION
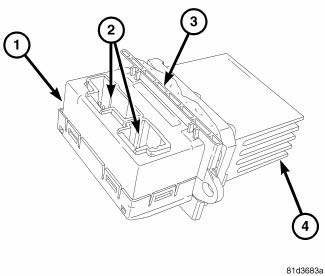
Fig. 59: Rear Blower Power Module Description
A blower motor power module is used on this model when equipped with the automatic temperature control (ATC) rear heating-A/C system. Models equipped with the manual temperature control (MTC) rear heating-A/C system use a blower motor resistor, instead of the blower motor power module.
The rear blower motor power module (1) is mounted to the inboard side of the rear heating-A/C housing, located on the right side of the vehicle. The rear blower motor power module consists of a molded plastic housing with two integral wire connector receptacles (2) for the power module electronic circuitry, a mounting plate (3) with a gasket and a finned aluminum heat sink (4).
The rear blower motor power module can be accessed for service without removing the rear heater-A/C housing.
OPERATION
The rear blower motor power module is connected to the vehicle electrical system through a dedicated lead and connector of the rear body wire harness. A second lead and connector of the wire harness is connected to the rear blower motor. The rear blower motor power module allows the microprocessor-based automatic temperature contro (ATC) A/C-heater control to calculate and provide infinitely variable blower motor speeds based upon either manual blower switch input or the ATC programming using a pulse width modulated (PWM) circuit strategy.
The PWM voltage is applied to a comparator circuit which compares the PWM signal voltage to the rear blower motor feedback voltage. The resulting output drives the power module circuitry, which provides a linear output voltage to change or maintain the desired blower speed.
The rear blower motor power module is diagnosed using a scan tool.
The rear blower motor power module cannot be adjusted or repaired must be replaced if inoperative or damaged.
REMOVAL

Fig. 60: Rear Blower Power Module Removal/Installation
1. Disconnect and isolate the negative battery cable.
2. Remove right rear quarter trim panel.
3. Disconnect the two wire harness connectors (4) from the rear blower motor power module (3).
4. Remove the two screws (1) that secure the rear blower motor power module to the rear heater-A/C housing (2) and remove the module.
INSTALLATION
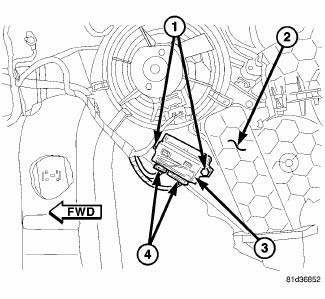
Fig. 61: Rear Blower Power Module Removal/Installation
1. Position the rear blower motor power module (3) onto the rear heater-A/C housing (2).
2. Install the two screws (1) that secure the rear blower motor power module to the rear heater-A/C housing.
Tighten the screws to 1.2 N.m (10 in. lbs.).
3. Connect the two wire harness connectors (4) to the rear blower motor power module.
4. Install the right rear quarter trim panel.
5. Reconnect the negative battery cable.
 Control, A/C and heater, rear
DESCRIPTION
The A/C-heater controls allows the driver and front seat passenger and the
intermediate seat passengers the
ability to regulate air temperature as well as fan speed for the rear
heat ...
 Resistor, blower motor, rear
DESCRIPTION
Fig. 62: Rear Blower Resistor
A blower motor resistor is used on this model when equipped with the manual
temperature control (MTC) rear
heating-A/C system. Models equipped with the ...
See also:
Assembly
NOTE: Cleanliness through entire disassembly and assembly of the valve
body cannot
be overemphasized. When disassembling, each part should be washed in a
suitable solvent, then dried by comp ...
Diagnosis and Testing
BASE BRAKE SYSTEM
NOTE: There are three diagnosis charts following that cover the RED
BRAKE
WARNING INDICATOR LAMP, BRAKE NOISE and OTHER BRAKE CONDITIONS.
RED BRAKE WARNING INDICATOR LAMP ...
Removal
FRONT
1. Raise and support the vehicle.
Fig. 163: TIRE AND WHEEL MOUNTING
2. Remove the wheel mounting nuts (3), then the tire and wheel assembly (1).
NOTE: In some cases, it may be necessary ...
