Dodge Journey: Removal
2.4L
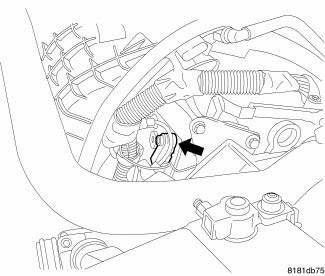
Fig. 45: Locating Knock Sensor
The knock sensor bolts into the side of the cylinder block in front of the starter under the intake manifold.
1. Disconnect and isolate negative battery cable.
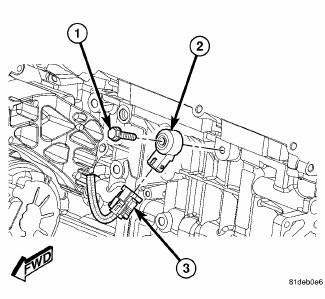
Fig. 46: 2.4L Knock Sensor
2. Disconnect electrical connector (3) from knock sensor (2).
3. Remove bolt (1) and knock sensor (2) from engine block.
2.7L
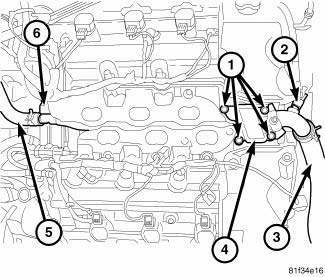
Fig. 47: Water Housing Outlet Tube 2.7L
- - Bolts
- - Coolant Temp Sensor Connector
- - Radiator Upper Hose
- - Water Housing Outlet Tube
- - Heater Hose
- - Retaining Clip
WARNING: Do not remove pressure cap with the system hot and under pressure because serious burns from coolant can occur.
1. Drain cooling system. 2. Disconnect and isolate the negative battery cable.
3. Remove lower intake manifold.
4. Remove radiator upper hose (3) at water housing outlet tube (4).
5. Remove heater hose (5) from water housing outlet tube (4) at rear of engine.
6. Disconnect water housing outlet tube (4) from retaining clip (6) at rear of engine.
7. Disconnect electrical connector (2) from coolant temperature sensor.
8. Remove 4 bolts (1) attaching water housing outlet tube (4) to cylinder heads.

Fig. 48: Knock Sensor Connector
9. Disconnect electrical connector from knock sensor.
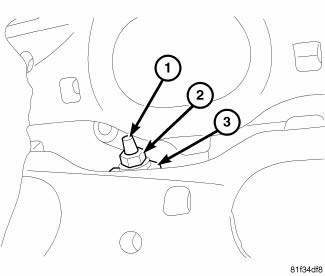
Fig. 49: Knock Sensor 2.7L
- - Stud
- - Nut
- - Knock Sensor
10. Reposition the water housing outlet tube and remove nut (2) from knock sensor mounting stud (1).
11. Remove knock sensor (3) from engine block.
3.5L

Fig. 50: Knock Sensor Connector
1. Disconnect the negative battery cable.
2. Remove the upper intake manifold.
3. Disconnect the electrical connector.

Fig. 51: Knock Sensor Location
4. Remove the knock sensor .
 Sensor, knock
...
 Installation
2.4L
Fig. 52: 2.4L Knock Sensor
CAUTION: Always torque knock sensors to the correct torque
specification. Over or
under tightening effects knock sensor performance. Ensure the electr ...
See also:
Camshaft, engine
DESCRIPTION
Fig. 108: Camshaft & Valvetrain Components
- CAMSHAFT BEARING CAP - INTAKE
- CAMSHAFT BEARING CAP - EXHAUST
- CAMSHAFT - EXHAUST
- ROCKER ARM
- HYDRAULIC LIFTER
- CYLI ...
Installation
Fig. 40: Seal Protector
- HALFSHAFT
- SEAL PROTECTOR
1. Install halfshaft to hub/bearing assembly. Install hub nut and washer but
do not tighten at this time.
2. Using Seal Protector 9 ...
Diagnosis and Testing
Rear Camera
The hardwired circuits of the Rear View Camera (RVC) and those between the
RVC and the radio receiver may
be diagnosed using conventional diagnostic tools and procedures.
The wiring ...
