Dodge Journey: Installation
2.4L FRONT

Fig. 38: Removing/Installing Camshaft Position Sensor
CAUTION: Install camshaft position (CMP) sensor utilizing twisting motion. Make sure CMP sensor is fully seated. Do not drive CMP sensor into the bore with mounting screw. This may cause CMP sensor to be incorrectly seated causing a faulty signal or no signal at all.
1. Lubricate sensor O-ring.
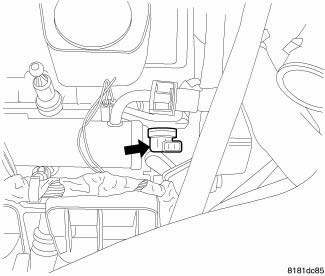
Fig. 39: Front Cam Sensor
2. Install CMP sensor and mounting bolt, tighten to 9 N.m (79.5 in. lbs.).
3. Connect electrical connector to camshaft position sensor.
4. Connect negative battery cable, tighten nut to 5 N.m (45 in. lbs.).
2.4L REAR

Fig. 40: Removing/Installing Camshaft Position Sensor
CAUTION: Install camshaft position (CMP) sensor utilizing twisting motion. Make sure CMP sensor is fully seated. Do not drive CMP sensor into the bore with mounting screw. This may cause CMP sensor to be incorrectly seated causing a faulty signal or no signal at all.
1. Lubricate sensor O-ring.
2. Install CMP sensor and mounting bolt, tighten to 9 N.m (79.5 in. lbs.).
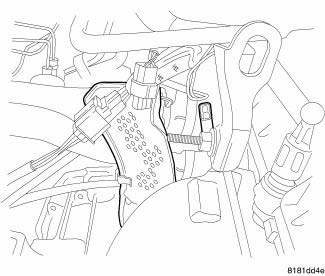
Fig. 41: Identifying Camshaft Position Sensor Heat Shield - Remove/Install
3. Connect electrical connector to camshaft position sensor.
4. Install heat shield onto mounting stud.
5. Install heat shield retaining nut and tighten.
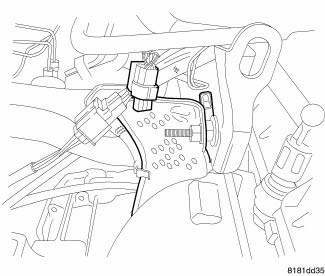
Fig. 42: Identifying Camshaft Position Sensor Heat Shield - Remove/Install
6. Connect the electrical connector.
7. Connect negative battery cable, tighten nut to 5 N.m (45 in. lbs.).
2.7L

Fig. 43: Cam Sensor Location 2.7L
CAUTION: Install camshaft position (CMP) sensor utilizing twisting motion. Make sure CMP sensor is fully seated. Do not drive CMP sensor into the bore with mounting screw. This may cause CMP sensor to be incorrectly seated causing a faulty signal or no signal at all.
NOTE: If reinstalling the sensor, check the sensor O-ring for damage and replace if necessary. Lubricate the O-ring with clean engine oil before installing the sensor.
1. Push the CMP sensor into the chain case cover with a twisting motion until fully seated.
2. While holding the sensor in this position, install and tighten the retaining bolt to 12 N.m (106 in. lbs.).
3. Connect and lock the electrical connector to the CMP sensor.
4. Connect the negative battery cable and tighten nut to 5 N.m (45 in. lbs.).
NOTE: The Cam/Crank Variation Relearn procedure must be performed anytime there has been a repair/replacement made to a powertrain system, for example: flywheel, valvetrain, camshaft and/or crankshaft sensors or components.
3.5L
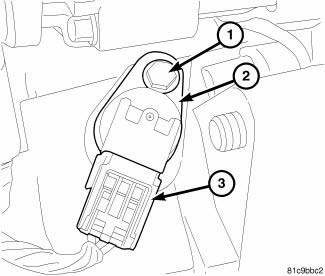
Fig. 44: 3.5L Camshaft Sensor
CAUTION: Install camshaft position (CMP) sensor utilizing twisting motion. Make sure CMP sensor is fully seated. Do not drive CMP sensor into the bore with mounting screw. This may cause CMP sensor to be incorrectly seated causing a faulty signal or no signal at all.
NOTE: If reinstalling the sensor, check the sensor O-ring for damage and replace if necessary. Lubricate the O-ring with clean engine oil before installing the sensor.
1. Push the CMP sensor (2) into the timing belt cover with a twisting motion until fully seated.
2. While holding the sensor (2) in this position, install and tighten the retaining bolt (1) to 12 N.m (106 in.lbs.).
3. Connect and lock the electrical connector (3) to the CMP sensor (2).
4. Connect the negative battery cable and tighten nut to 5 N.m (45 in. lbs.).
NOTE: The Cam/Crank Variation Relearn procedure must be performed anytime there has been a repair/replacement made to a powertrain system, for example: flywheel, valvetrain, camshaft and/or crankshaft sensors or components.
 Operation, Removal
OPERATION
CAMSHAFT AND CRANKSHAFT SIGNALS
Fig. 29: 4 Cylinder Cam & Crank Signals
NOTE: The graphic represents the relationship between camshaft and
crankshaft
sensors edges with cams ...
 Sensor, knock
...
See also:
Description
Fig. 1: Front Suspension Components
This vehicle has a gas pressurized MacPherson strut type front suspension
design.
Each side of the front suspension consists of these major components:
...
Description, Operation
DESCRIPTION
Fig. 231: Receiver/Drier Description
The A/C receiver/drier (1) stores unused refrigerant, filters the
refrigerant, helps remove moisture from the
refrigerant and retains any refrig ...
Crankshaft
Description
The crankshaft is constructed of a forged micro alloy steel. The six throw,
nine counterweight crankshaft is
supported by four select fit main bearings with the number three serving as ...
