Dodge Journey: Installation
2.4L

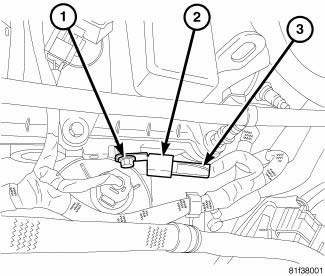
Fig. 7: Capacitor 2.4L
- - Bolt
- - Capacitor
- - Connector
1. Install ignition coil capacitor (2) and bolt (1), tighten bolt to 10 N.m (88.5 ft. lbs.).
2. Connect electrical connector (3).
3. Install engine cover.
4. Connect negative battery cable, tighten nut to 5 N.m (45 in. lbs.).
2.7L 1st

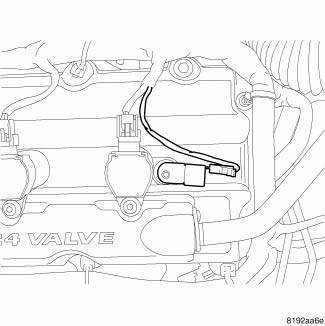
Fig. 8: 1st Ignition Capacitor - 2.7L
1. Install ignition coil capacitor and nut.
2. Tighten nut to 10 N.m (88.5 in. lbs.).
3. Attach electrical connector to capacitor.
4. Connect negative battery cable and tighten nut to 5 N.m (45 in. lbs.).
2.7L 2nd

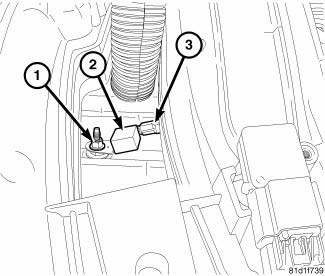
Fig. 9: 2nd Ignition Capacitor - 2.7L
1. Install ignition coil capacitor (2) and bolt (1).
2. Tighten bolt to 28 N.m (20.5 ft. lbs.).
3. Connect electrical connector (3).
4. Connect negative battery cable and tighten nut to 5 N.m (45 in. lbs.).
3.5L

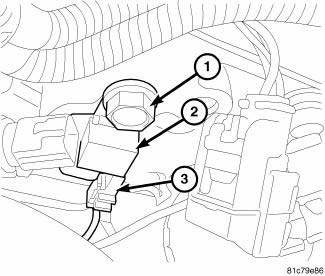
Fig. 10: Ignition Capacitor - 3.5L
1. Install ignition coil capacitor (2) and bolt (1).
2. Tighten bolt to 28 N.m (20.5 ft. lbs.).
3. Connect electrical connector (3).
4. Connect negative battery cable and tighten nut to 5 N.m (45 in. lbs.).
 Removal
2.4L
Fig. 3: Capacitor 2.4L
- Bolt
- Capacitor
- Connector
1. Disconnect and isolate negative battery cable at battery.
2. Remove engine cover.
3. Remove electrical connector (3).
...
 Coil, ignition
...
See also:
Camshaft, engine
DESCRIPTION
Fig. 108: Camshaft & Valvetrain Components
- CAMSHAFT BEARING CAP - INTAKE
- CAMSHAFT BEARING CAP - EXHAUST
- CAMSHAFT - EXHAUST
- ROCKER ARM
- HYDRAULIC LIFTER
- CYLI ...
Fluid, differential
Standard Procedure
STANDARD PROCEDURE - DIFFERENTIAL ASSEMBLY FLUID CHANGE
Fig. 79: Differential Assembly Fluid Change
The drain plug (2) for the differential assembly is located in the bottom of ...
Module, heated seat
DESCRIPTION
Fig. 4: Locating Heated Seat Module
The heated seat module (2) is located under the driver front seat. It has a
single electrical connector (1) and a
push pin style retainer that se ...
