Dodge Journey: Sensor, exhaust pressure
REMOVAL
EXHAUST PRESSURE SENSOR
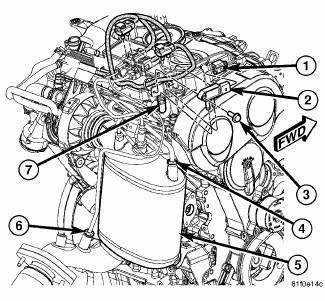
Fig. 42: DPF Components
- - ELECTRICAL CONNECTOR
- - PRESSURE DIFFERENTIAL SENSOR
- - MOUNTING BOLT
- - UPSTREAM PRESSURE TUBE
- - DPF
- - DOWNSTREAM PRESSURE TUBE
- - TUBING
INSTALLATION
EXHAUST PRESSURE SENSOR

Fig. 43: DPF Components
- - ELECTRICAL CONNECTOR
- - PRESSURE DIFFERENTIAL SENSOR
- - MOUNTING BOLT
- - UPSTREAM PRESSURE TUBE
- - DPF
- - DOWNSTREAM PRESSURE TUBE
- - TUBING
1. Install tubing (7) on pressure differential sensor (2).
2. Position pressure differential sensor (2) and tubing (7).
3. Install pressure differential sensor mounting bolt (3). Tighten to 10 N.m (89 in. lbs.).
4. Install downstream pressure tube (6) into catalytic converter. Tighten the fitting to 10 N.m (89 in. lbs.).
5. Install upstream pressure tube (4) into catalytic converter. Tighten the fitting to 10 N.m (89 in. lbs.)
6. Position electrical connector (1) into bracket.
7. Connect negative battery cable.
 Installation
2.7L ENGINE
Fig. 32: Maniverter To Cross Under Fasteners
1. Install the cross under pipe (3). and the front maniverter-to-cross under
fasteners (1) and (2). Tighten to
27 Nm (20 ft. lb.).
Fi ...
 Sensor, exhaust temperature
REMOVAL
EXHAUST TEMPERATURE SENSOR
Fig. 44: Exhaust Temperature Sensor
- DPF TEMPERATURE SENSOR ELECTRICAL CONNECTOR
- DPF TEMPERATURE SENSOR
1. Remove engine cover.
2. Disconnect and ...
See also:
Removal
DIESEL PARTICULATE FILTER
Fig. 8: DPF Components
- ELECTRICAL CONNECTOR
- PRESSURE DIFFERENTIAL SENSOR
- MOUNTING BOLT
- UPSTREAM PRESSURE TUBE
- DPF
- DOWNSTREAM PRESSURE TUBE
- TU ...
JUMP-STARTING
If your vehicle has a discharged battery it can be jumpstarted
using a set of jumper cables and a battery in
another vehicle or by using a portable battery booster
pack. Jump-starting can be danger ...
Valve, exhaust gas recirculation (EGR)
Description
The EGR valve consists of three major components. First there is the pintle,
valve seat, and housing which
contains and regulates the gas flow. Second there is the armature, return
s ...
