Dodge Journey: Draincock, radiator
Removal
DRAINCOCK

Fig. 65: DRAINCOCK & RADIATOR TANK
CAUTION: Use of pliers on draincock is not recommended. Damage may occur to radiator or draincock.
NOTE: It is not necessary to remove draincock during a routine coolant drain.
1. Remove belly pan (if equipped).
2. Drain the cooling system.
3. Open the draincock (2) by turning it counterclockwise until it stops.
4. Turn the draincock (2) back (clockwise) 1/8 turn.
5. Pull the draincock (2) from the radiator tank (1).
Installation
DRAINCOCK
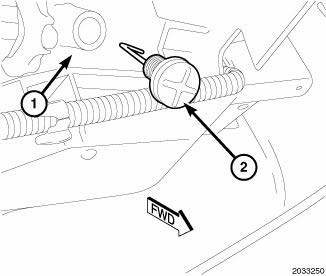
Fig. 66: DRAINCOCK & RADIATOR TANK
1. Align draincock (2) stem to radiator tank (1) opening.
2. Push draincock (2) into the radiator tank (1) opening.
3. Tighten the draincock (2) by turning clockwise until it stops.
4. Fill the cooling system.
5. Install belly pan (if equipped).
 Cooler, EGR
Description
Fig. 62: EGR COOLER
- EGR COOLER TO EGR VALVE TUBE
- MOUNTING SCREWS
- EGR COOLER MOUNTING SCREW
- MOUNTING SCREW
- EGR COOLER BODY
- EGR COOLER MOUNTING NUT
- EGR COOLE ...
 Fan, cooling
Description
Fig. 67: COOLING SYSTEM - OVERVIEW
- WINDSHIELD WASHER RESERVOIR
- UPPER SUPPORT
- FAN SHROUD
- FAN MOTOR
- LOWER RADIATOR HOSE
The radiator fan module includes a support ...
See also:
Speaker
OPERATION
Two wires connected to each speaker, one feed circuit (+) and one return
circuit (-), allow the audio output signal electrical current to flow through
the voice coil. The wiring informa ...
Removal
LEFT-HAND-DRIVE
CAUTION: The vacuum in the power brake booster must be pumped down
before
removing the master cylinder to prevent the booster from sucking in any
contamination. This ...
Filter, particulate air
Description
Fig. 85: Filter-Particulate Air Description
Some models are equipped with a particulate air filter (1) that helps purify
the outside air entering the HVAC
housing. The filter is mou ...
