Dodge Journey: Belt, serpentine, power steering
Removal
2.7L ENGINE
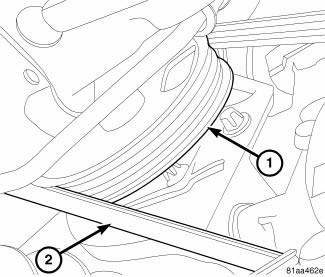
Fig. 28: STRETCH TO FIT POWER STEERING BELT REMOVAL
- - POWER STEERING PULLEY
- - STRETCH TO FIT POWER STEERING BELT
1. Raise and support the vehicle.
2. Remove RH wheelhouse splash shield.
3. Use a socket and ratchet to rotate the crankshaft clockwise.
4. While rotating the crankshaft clockwise, walk the power steering drive belt (2) off of the power steering pulley (1)
5. Remove the power steering drive belt (2).
Installation
2.7L ENGINE
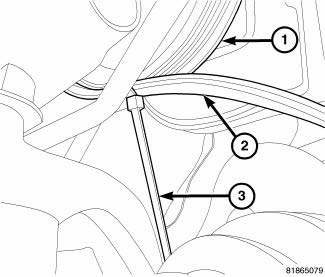
Fig. 29: POWER STEERING DRIVE BELT INSTALLATION
- - P/S PUMP PULLEY
- - POWER STEERING BELT
- - NYLON WIRE TIE
1. Position the power steering drive belt (2) on the crankshaft pulley. Make sure the belt (2) is fully seated in the crankshaft pulley grooves.
2. Position the bottom of the drive belt (2) on the bottom of the power steering pulley (1).
NOTE: Use only wire ties with nylon locks, not metal.
3. Working from the back side of the power steering pulley (1), insert a nylon wire tie (3), 7.75X1/8x0.050 in. through one of the holes in the pulley (1).
4. Tighten the wire tie to hold the drive belt (2) in position.
5. While holding the drive belt (2) to make sure it stays in position, slowly rotate the engine clockwise.
6. Once the belt is in position on the pulley (1), continue rotating the engine until the wire tie snaps (3).
7. Remove the wire tie (3) from the vehicle.
8. Install the RH wheelhouse splash shield.
 Belt, serpentine
Description
Fig. 15: ACCESSORY DRIVE BELT - WORLD ENGINE
- POWER STEERING PUMP
- ACCESSORY DRIVE BELT
- GENERATOR
- CRANKSHAFT PULLEY
- LOWER IDLER PULLEY
- CRANKSHAFT PULLEY
- WATE ...
 Pulley, idler
Removal
2.4L ENGINE
Fig. 30: ACCESSORY DRIVE BELT IDLER PULLEY - 2.4L
- UPPER PULLEY
- LOWER PULLEY
1. Remove accessory drive belt.
2. Remove upper idler pulley (1) and bolt.
3. Re ...
See also:
JUMP-STARTING
If your vehicle has a discharged battery it can be jumpstarted
using a set of jumper cables and a battery in
another vehicle or by using a portable battery booster
pack. Jump-starting can be danger ...
Removal
BEVERAGE COOLER
WARNING: Disable the airbag system before attempting any steering
wheel, steering
column, or instrument panel component diagnosis or service. Disconnect
and isolate t ...
Installation
LEFT-HAND DRIVE
1. Clean any debris off the mating surfaces of the HCU and ABM.
CAUTION: When installing new O-rings or solenoid valve stem seals,
do not use
any type of lubricant.
...
