Dodge Journey: Insulator, engine mount, right
Removal

Fig. 243: Belly Pan
1. Remove the belly pan (2).

Fig. 244: Right Engine Mount
2. Lower vehicle. Remove the load on the engine motor mounts by carefully supporting the engine assembly from below.
3. Remove coolant recovery container.
4. Disconnect the ground strap.
5. Remove the right engine support bracket vertical fasteners (1) and (2) and remove support bracket (3).
6. Remove the bolts (5) attaching the right isolator (4) to the frame rail.
7. Remove right isolator (4).
Installation
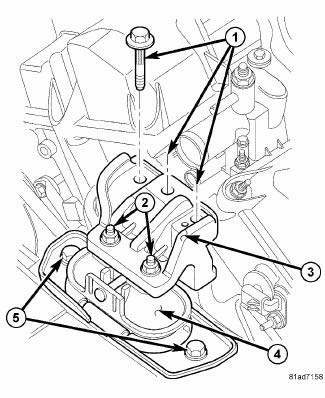
Fig. 245: Right Engine Mount
1. Position right isolator (4) and install the isolator to frame rail bolts (5). Tighten bolts to 55 N.m (40 ft.lbs.).
2. Install the engine support bracket (3) and bolts (1). Tighten bolts to 50 N.m (37 ft. lbs).
3. Install the support bracket to isolator nuts (2) and tighten to 30 N.m (22 ft. lbs).
4. Reconnect the ground strap.
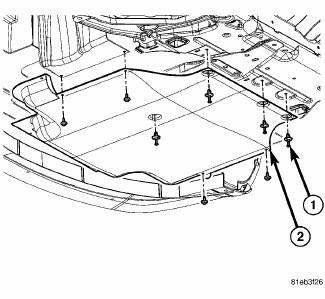
Fig. 246: Belly Pan
5. Raise vehicle on a hoist.
6. Install the belly pan (2).
7. Install coolant recovery container.
 Insulator, engine mount, rear
Removal
Fig. 234: Belly Pan
1. Remove throttle body air inlet hose and air cleaner housing assembly.
2. Raise the vehicle.
3. Remove the belly pan (2).
Fig. 235: Identifying Rear Mount B ...
 Lubrication
...
See also:
Speaker
OPERATION
Two wires connected to each speaker, one feed circuit (+) and one return
circuit (-), allow the audio output signal electrical current to flow through
the voice coil. The wiring informa ...
Ensioner, belt
Removal
2.4L ENGINE
Fig. 36: ACCESSORY DRIVE BELT - WORLD ENGINE
- POWER STEERING PUMP
- ACCESSORY DRIVE BELT
- GENERATOR
- CRANKSHAFT PULLEY
- LOWER IDLER PULLEY
- CRANKSHAFT PULLEY ...
Diagnosis and Testing
BASE BRAKE SYSTEM
NOTE: There are three diagnosis charts following that cover the RED
BRAKE
WARNING INDICATOR LAMP, BRAKE NOISE and OTHER BRAKE CONDITIONS.
RED BRAKE WARNING INDICATOR LAMP ...
