Dodge Journey: Seal, crankshaft oil, rear
Removal

Fig. 214: REAR MAIN SEAL-INSTALLED
The crankshaft rear oil seal is incorporated in the seal adapter (2) and can not be removed from the adapter. The crankshaft rear oil seal/seal adapter (2) are serviced as an assembly.

Fig. 215: Flex Plate
1. Remove transmission.
2. Remove flex plate attaching bolts (2), backing plate (3), and flex plate (1).
3. Remove oil pan.
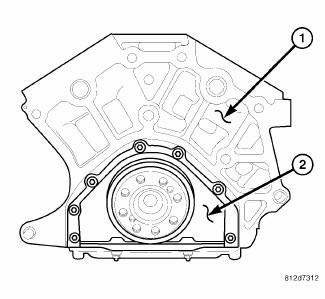
Fig. 216: REAR MAIN SEAL-INSTALLED
4. Remove seal retainer attaching screws.
5. Remove crankshaft rear oil seal/adapter (2).
Installation
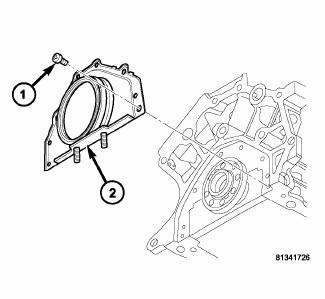
Fig. 217: Oil Seal Retainer
NOTE: Inspect the crankshaft to make sure no nicks or burrs are on the seal surface.
1. Clean sealing surfaces thoroughly.
2. Apply engine oil to the seal lip inside diameter.
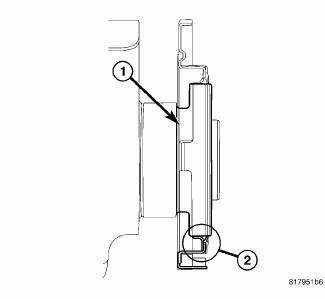
Fig. 218: REAR SEAL INSTALLED
NOTE: The seal lip (2) on the retainer must always uniformly curl inward toward the engine on the crankshaft (1).

Fig. 219: REAR MAIN INSTALLATION
3. Position the special tool 6926 (1) onto the crankshaft and gently slide the seal (2) over the crankshaft.
4. Install seal retaining bolts finger tight.
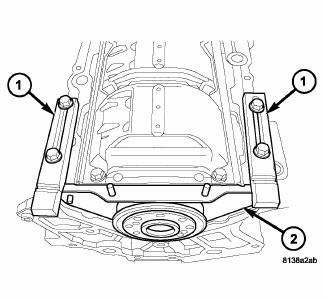
Fig. 220: REAR MAIN - SPECIAL TOOL 8225
NOTE: The following steps must be performed to prevent oil leaks at sealing joints.
5. Attach Special Tools 8225 (1) to pan rail using the oil pan fasteners.
NOTE: Make sure that the "2.7L" stamped on the special tool is facing the cylinder block (flat side of tools against pan rail).
NOTE: Make sure that the seal flange is flush with the block oil pan sealing surface.
6. While applying firm pressure to the seal assembly (2) against Special Tools 8225 (1), tighten seal assembly screws to 12 N.m (105 in. lbs.).
7. Remove special tool 8225.
8. Install oil pan.
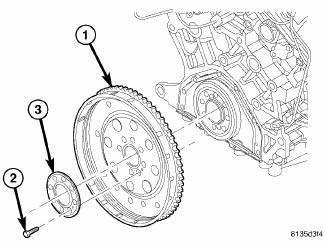
Fig. 221: Flex Plate
9. Install flex plate (1), backing plate (3), and attaching bolts (2).
10. Install transmission.
11. Fill with oil (5).
12. Start engine and check for leaks.
 Seal, crankshaft oil, front
Removal
Fig. 212: Crankshaft Front Oil Seal - Removal
- SPECIAL TOOL 6771
1. Remove crankshaft vibration damper.
2. Install Special Tool 8194, Insert into crankshaft nose. Remove seal us ...
 Engine mounting
...
See also:
Filter, particulate air
Description
Fig. 85: Filter-Particulate Air Description
Some models are equipped with a particulate air filter (1) that helps purify
the outside air entering the HVAC
housing. The filter is mou ...
EMISSIONS INSPECTION AND MAINTENANCE PROGRAMS
In some localities, it may be a
legal requirement to pass
an inspection of this vehicle’s emissions control system.
Failure to pass could prevent vehicle registration.
For states that require a ...
LIGHTS
Multifunction Lever
The multifunction lever controls the operation of the
headlights, parking lights, turn signal lights, instrument
panel lights, instrument panel light dimming, interior
lights a ...
