Dodge Journey: Seal, crankshaft oil, front
Removal
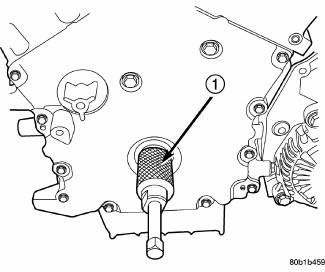
Fig. 212: Crankshaft Front Oil Seal - Removal
- - SPECIAL TOOL 6771
1. Remove crankshaft vibration damper.
2. Install Special Tool 8194, Insert into crankshaft nose. Remove seal using Special Tool 6771, Remover (1).
Installation
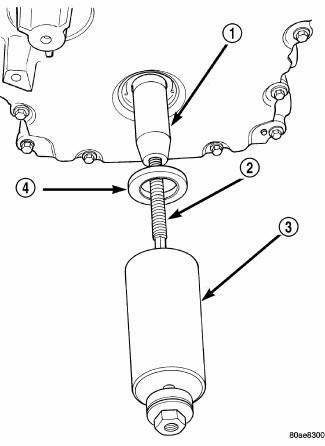
Fig. 213: Crankshaft Front Oil Seal - Installation
- - SPECIAL TOOL 6780-2
- - SPECIAL TOOL 8179
- - SPECIAL TOOL 6780-1
- - SEAL
1. Install new seal using Special Tools 6780-2 Sleeve, 6780-1 Installer, and 8179 Stud (2).
2. Install crankshaft vibration damper.
 Rod, piston and connecting
Description
Fig. 206: Piston & Connecting Rod
- "F" TOWARD FRONT OF ENGINE
- RING COMPRESSOR
- SPECIAL TOOL 8189
- OIL SQUIRT HOLE
The pistons (1) are made of a high stre ...
 Seal, crankshaft oil, rear
Removal
Fig. 214: REAR MAIN SEAL-INSTALLED
The crankshaft rear oil seal is incorporated in the seal adapter
(2) and can not be removed from the adapter. The
crankshaft rear oil seal/seal adapte ...
See also:
40/41TE Transaxle general diagnosis, road test
40/41TE TRANSAXLE GENERAL DIAGNOSIS
NOTE: Before attempting any repair on a 40/41TE four-speed automatic
transaxle,
check for Diagnostic Trouble Codes (DTC's) using the scan tool.
Transaxl ...
Removal
Fig. 431: Identifying Battery Cables
- BATTERY POSITIVE CABLE
- THERMO-WRAP
- BATTERY NEGATIVE CABLE
NOTE: If valve body is replaced or reconditioned, the PCM Quick Learn
Procedure
...
Description
Fig. 1: Exterior Lighting System
The exterior lighting system for this vehicle includes the following exterior
lamp units:
Center High Mounted Stop Lamp (3) - A standard equipment Center High ...
