Dodge Journey: Flexplate
Removal
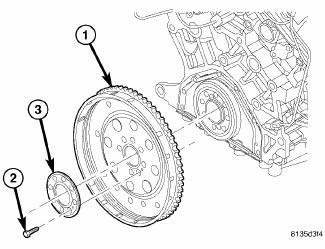
Fig. 198: Flex Plate
1. Remove transmission.
2. Remove flex plate attaching bolts (2).
3. Remove backing plate (3) and flex plate (1).
Installation
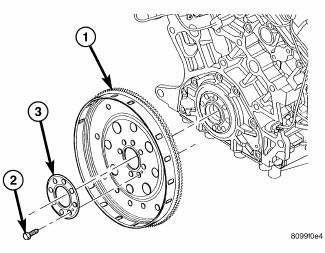
Fig. 199: FLEX PLATE
1. Position the flex plate (1) with backing plate (3) on the crankshaft.
2. Apply Mopar Lock AND Seal Adhesive to the eight flex plate bolts (2).
3. Install the flex plate bolts (2). Tighten the bolts to 95 N.m (70 ft. lbs.).
4. Install the transaxle.
NOTE: The Cam/Crank Variation Relearn procedure must be performed anytime there has been a repair/replacement made to a powertrain system, for example: flywheel, valvetrain, camshaft and/or crankshaft sensors or components.
 Damper, vibration
Removal
Fig. 196: Vibration Damper - Removal
- SPECIAL TOOL 8454 PULLER
- SPECIAL TOOL 8194 INSERT
1. Disconnect negative battery cable.
2. Remove right front wheel and belt splash shie ...
 Ring(s), piston
Standard Procedure
PISTON RING FITTING
Fig. 200: CHECK GAP ON PISTON RINGS
- FEELER GAUGE
1. Wipe cylinder bore clean. Insert ring and push down with piston to ensure
it is square in bore ...
See also:
TO OPEN AND CLOSE THE HOOD
Two latches must be released to open the hood.
1. Pull the hood release lever located under the left side
of the instrument panel.
Hood Release
2. Outside of the vehicle, locate the safety latch ...
Insulator, engine mount, right
Removal
Fig. 243: Belly Pan
1. Remove the belly pan (2).
Fig. 244: Right Engine Mount
2. Lower vehicle. Remove the load on the engine motor mounts by carefully
supporting the engine assembly ...
Ensioner, belt
Removal
2.4L ENGINE
Fig. 36: ACCESSORY DRIVE BELT - WORLD ENGINE
- POWER STEERING PUMP
- ACCESSORY DRIVE BELT
- GENERATOR
- CRANKSHAFT PULLEY
- LOWER IDLER PULLEY
- CRANKSHAFT PULLEY ...
