Dodge Journey: Description, standard procedure
DESCRIPTION

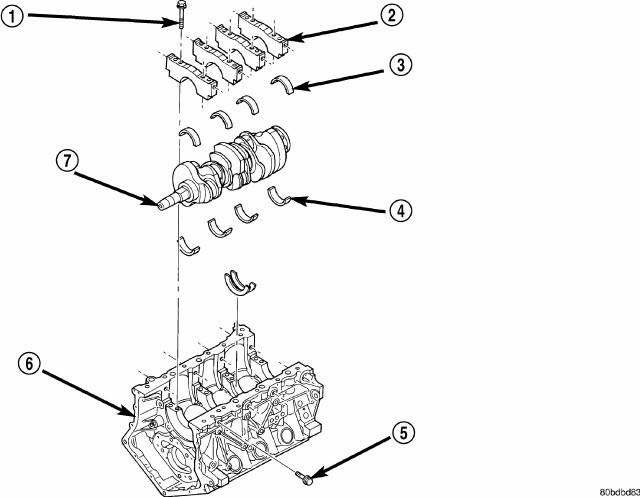
Fig. 163: Engine Block & Crankshaft
- - MAIN CAP BOLT-VERTICAL
- - MAIN CAP
- - MAIN BEARING-LOWER
- - MAIN BEARING-UPPER
- - MAIN CAP BOLT - HORIZONTAL
- - CYLINDER BLOCK
- - CRANKSHAFT
The cylinder block (6) is made of heat treated aluminum with cast-in-place iron liners. The block is a closed deck design with the right bank forward. To provide high rigidity and improved NVH, the block has cast-in contours and ribs, along with powdered metal main caps (2) each with 6 bolts, 4 vertical (1) and 2 horizontal (5). The engine is equipped with a windage tray mounted to the main caps.
The block design allows coolant flow between the cylinder bores and an internal coolant by-pass to the thermostat.
STANDARD PROCEDURE
CYLINDER BORE HONING

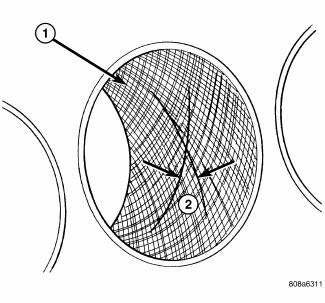
Fig. 164: Cylinder Bore Cross-Hatch Pattern
- - CROSS-HATCH PATTERN
- - 40º-60º
1. Used carefully, a quality commercially available cylinder bore resizing hone equipped with 220 grit stones, is the best tool for this honing procedure. In addition to deglazing, it will reduce taper and out-ofround as well as removing light scuffing, scoring or scratches. Usually a few strokes will clean up a bore and maintain the required limits.
2. Deglazing of the cylinder walls may be done using a quality commercially available cylinder surfacing hone, recommended tool C-3501 or equivalent, equipped with 280 grit stones, if the cylinder bore is straight and round. 20-60 strokes depending on the bore condition, will be sufficient to provide a satisfactory surface. Use a light honing oil. Do not use engine or transmission oil, mineral spirits or kerosene. Inspect cylinder walls after each 20 strokes.
3. Honing should be done by moving the hone up and down fast enough to get a cross-hatch pattern. When hone marks intersect at 40-60 degrees, the cross hatch angle is most satisfactory for proper seating of rings.
4. A controlled hone motor speed between 200-300 RPM is necessary to obtain the proper cross-hatch angle. The number of up and down strokes per minute can be regulated to get the desired 40-60 degree angle. Faster up and down strokes increase the cross-hatch angle.
5. After honing, it is necessary that the block be cleaned again to remove all traces of abrasive.
CAUTION: Ensure all abrasives are removed from engine parts after honing. It is recommended that a solution of soap and hot water be used with a brush and the parts then thoroughly dried. The bore can be considered clean when it can be wiped clean with a white cloth and cloth remains clean. Oil the bores after cleaning to prevent rusting.
CLEANING
Clean cylinder block thoroughly using a suitable cleaning solvent.
INSPECTION
ENGINE BLOCK

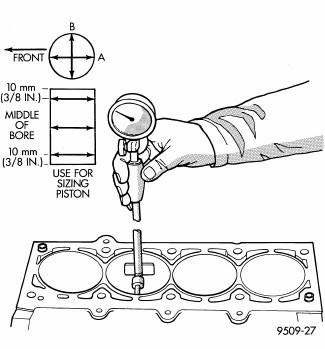
Fig. 165: Checking Cylinder Bore Size
1. Clean cylinder block thoroughly and check all core hole plugs for evidence of leaking.
2. If new core plugs are to be installed, see Engine - Standard Procedure.
3. Examine block and cylinder bores for cracks or fractures.
4. Check block deck surfaces for flatness. Deck surface must be within service limit of 0.1 mm (0.004 in.).
CYLINDER BORE
NOTE: The cylinder bores should be measured at normal room temperature, 21ºC (70º F).
The cylinder walls should be checked for out-of-round and taper with Tool C119 or equivalent. If the cylinder walls are badly scuffed or scored, the cylinder block should be replaced, and new pistons and rings fitted.
Measure the cylinder bore at three levels in directions A and B. Top measurement should be 10 mm (3/8 in.) down and bottom measurement should be 10 mm (3/8 in.) up from bottom of bore.
 Engine block
...
 Bearing(s), connecting rod
Standard Procedure
CONNECTING ROD AND BEARING FITTING
CONNECTING ROD BEARING
Fig. 166: Checking Connecting Rod Bearing Clearance-Typical
Fit all connecting rods on one bank until complete.
Th ...
See also:
Diagnosis and Testing
LAMPS/LIGHTING - EXTERIOR
WARNING: To avoid serious or fatal injury on vehicles equipped
with airbags, disable
the Supplemental Restraint System (SRS) before attempting any steering
...
STORAGE
Instrument Panel Storage Compartment — If
Equipped
Press and release the button on the door to open it. The
door swings upward to allow easy access to the compartment.
Instrument Panel Storage ...
Installation
LEFT-HAND-DRIVE
NOTE: The master cylinder must be bled before installing it on the
vehicle.
1. Bench bleed the master cylinder.
2. Wipe the face of the power brake booster clean where the ...
