Dodge Journey: Lifter(s), hydraulic
Diagnosis and Testing
DIAGNOSIS AND TESTING - HYDRAULIC LASH ADJUSTER NOISE DIAGNOSIS
Proper noise diagnosis is essential in locating the source of a NVH complaint. Locating a lash adjuster (tappet) type noise can sometimes be difficult. As a result, an initial misdiagnosis may occur.
Refer to LASH ADJUSTER (TAPPET) NOISE CHART indicating possible lash adjuster (tappet) noise sources and possible sources that could lead to a misdiagnosis.
Refer to LASH ADJUSTER (TAPPET) NOISE CHART for possible causes and correction of a lash adjuster (tappet) type noise.
LASH ADJUSTER (TAPPET) NOISE CHART
| POSSIBLE CAUSES | CORRECTION |
| 1. Engine oil level-too high or too low. This may cause aerated oil to enter the adjusters and cause them to be spongy. | 1. Check and correct engine oil level. |
| 2. Insufficient running time after rebuilding cylinder head. | 2. Low speed running of up to 1 hour may be required to fully evacuate trapped air from the valve train system. During this time, turn engine off and let set for a few minutes before restarting. Repeat this several times after engine has reached normal operating temperature. |
| 3. Air trapped in lash adjuster (after 1 hour run time). | 3. See below: (a) Check lash adjusters for sponginess while installed in cylinder head. Depress part of rocker arm over adjuster. Normal adjusters should feel very firm. Very spongy adjusters can be bottomed out easily. (b) If lash adjuster(s) are still spongy, replace with new adjuster/rocker arm assembly. |
| 4. Low oil pressure | 4. See below: (a) Check and correct engine oil level. (b) Check engine oil pressure. (c) Check for excessive bearing clearance and correct. (d) Check for worn oil pump. |
| 5. Oil passage to cylinder head(s) plugged with debris. | 5. Check cylinder head oil passages and cylinder head gasket restrictor for blockage. Clean or replace as necessary. |
| 6. Worn valve guide(s). | 6. Ream guide(s) and replace valve(s) with oversize valves and seal(s). |
| 7. Air injested into oil due to broken or cracked oil pump pickup tube. | 7. Inspect pickup tube and replace as necessary. |
| 8. Collapsed lash adjuster due to debris injestion. | 8. Clean debris from engine and replace lash adjuster(s). |
REMOVAL

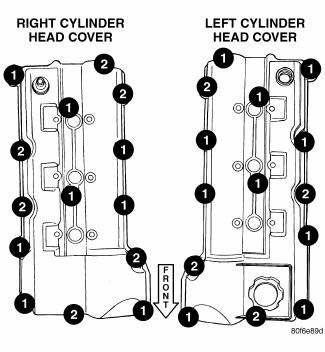
Fig. 131: Cylinder Head Cover Fasteners
- - DOUBLE ENDED STUDS
- - BOLTS
1. Remove cylinder head cover(s).
CAUTION: If lash adjusters and rocker arms are to be reused, always mark position for reassembly in their original positions.
2. Remove rocker arm(s).
3. Remove lash adjuster(s).
INSTALLATION

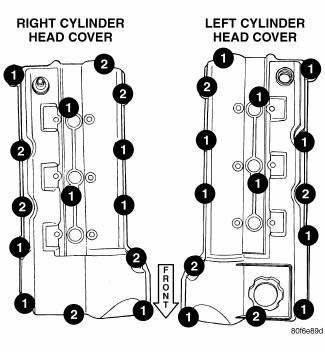
Fig. 132: Cylinder Head Cover Fasteners
- - DOUBLE ENDED STUDS
- - BOLTS
1. Install hydraulic lash adjuster making sure adjusters are at least partially full of oil. This can be verified by little or no plunger travel when lash adjuster is depressed.
2. Install the rocker arm(s).
3. Install the cylinder head covers.
 Cover(s), cylinder head, right
REMOVAL
1. Disconnect negative battery cable.
Fig. 126: Engine Harness Retaining Clips
- Left cylinder head cover engine harness retainers
- Right cylinder head cover engine harness retainer ...
 Rocker arm, valve
DESCRIPTION
Fig. 133: Rocker Arm
- LASH ADJUSTER POCKET
- OIL SQUIRT HOLE
- ROLLER
The rocker arms are composed of steel stamping with an integral roller
bearing. The rocker arms incor ...
See also:
Wheel alignment
PRE-WHEEL ALIGNMENT INSPECTION
Before any attempt is made to change or correct the wheel alignment, the
following inspection and necessary
corrections must be made to the vehicle to ensure proper ...
Chain and sprockets, timing
Removal
TIMING CHAIN AND CAM SPROCKETS
Fig. 334: TIMING MARK ALIGNMENT
- CAMSHAFT TIMING MARKS
- CRANKSHAFT TIMING MARKS
1. Disconnect negative battery cable.
2. Drain cooling system.
...
Installation
CAUTION: To prevent damage to the plastic evaporator tube bracket,
carefully guide
the heater core tubes past the bracket during installation of the heater
core.
Fig. 278: Re ...
