Dodge Journey: Tray, battery
DESCRIPTION
The battery is placed and secured in a stamped steel battery tray. The battery tray is located in the left front side of the vehicle, just ahead of the left front wheel and tire assembly. The battery tray is secured to the left front frame rail with four bolts.
REMOVAL
WARNING: To protect the hands from battery acid, a suitable pair of heavy duty rubber gloves should be worn when removing or servicing a battery.
Safety glasses also should be worn.
WARNING: Remove metallic jewelry to avoid injury by accidental arcing of battery current.
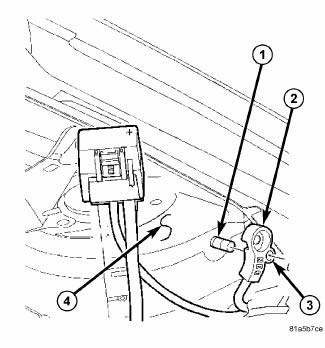
Fig. 44: Identifying Battery Cables & Terminals
CAUTION: The negative battery cable remote terminal (2) must be disconnected and isolated from the remote battery post (1) prior to service of the vehicle electrical systems. The negative battery cable remote terminal can be isolated by using the supplied isolation hole (3) in the terminal casing.
1. Disconnect and isolate the negative battery cable remote terminal from the remote battery post.
2. Remove the battery.
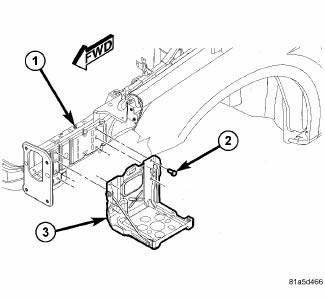
Fig. 45: View Of Battery Tray & Fasteners
3. Remove the four bolts (2) securing the battery tray (3) to the left front frame rail (1).
4. Remove the battery tray from the vehicle.
INSTALLATION
WARNING: To protect the hands from battery acid, a suitable pair of heavy duty rubber gloves should be worn when removing or servicing a battery.
Safety glasses also should be worn.
WARNING: Remove metallic jewelry to avoid injury by accidental arcing of battery current.
CAUTION: The negative battery cable remote terminal (2) must be disconnected and isolated from the remote battery post (1) prior to service of the vehicle electrical systems. The negative battery cable remote terminal can be isolated by using the supplied isolation hole (3) in the terminal casing.

Fig. 46: View Of Battery Tray & Fasteners
1. Position the battery tray (3) onto the left front frame rail (1).
2. Install the bolts (2) securing the battery tray (3) to the frame rail (1).
Tighten the bolts to 16 N.m (142 in. lbs.)

Fig. 47: Identifying Battery Cables & Terminals
3. Install the battery.
4. Install the negative battery cable remote terminal onto the remote battery post.
Tighten the nut to 16.5 N.m (145 in. lbs.)
 Installation
BATTERY HARNESS
Fig. 36: Mounting Clips And TIPM Housing
1. Position the battery harness into the vehicle.
2. One at a time, install the battery harness retaining pushpins, fasteners and
rout ...
 Charging
...
See also:
Motor, headlamp leveling, export
DESCRIPTION
Fig. 37: Headlamp Leveling Motor
The headlamp leveling motor (1) is located on the rear surface of each front
lamp unit on vehicles equipped
with the headlamp leveling system, which ...
Engine oil leak inspection
Begin with a thorough visual inspection of the engine, particularly at the
area of the suspected leak. If an oil
leak source is not readily identifiable, the following steps should be followed:
1. ...
Description, Operation
DESCRIPTION
Fig. 1: Battery Components
This vehicle is equipped with a single 12-volt battery. All of the components
of the battery system are located in
the front of the vehicle, just ahead of ...
