Dodge Journey: Without intermediate shaft
NOTE: Never grasp the halfshaft assembly by the inner or outer boots doing so may damage to the boot.
NOTE: The inner tripod joints are designed with a retention feature that prevents the tripod rollers from coming out of the inner joint housing up to a specific load. If this feature is overcome and any of the rollers are pulled past the retention feature the joint will "lock-up" and no longer function properly. The entire halfshaft assembly must be replaced if this occurs.
NOTE: Some halfshafts use a tuned rubber damper weight. When replacing a halfshaft assembly, be sure the replacement halfshaft has a damper weight.

Fig. 1: Removing/Installing Halfshaft Nut
1. Raise vehicle.
2. Remove the wheel and tire assembly from the vehicle.
3. Apply the service brakes to keep hub from turning, then loosen the halfshaft nut (2).
NOTE: Do not re-use the hub nut. The hub nut is a single-use type. A new hub nut is required for reassembly.
4. Remove the nut (2) from the halfshaft (1) and discard it.
Fig. 2: Front Brake Mounting
5. Remove the two bolts (4) that secure the front disc brake caliper (5) and adapter (6) to the steering knuckle (3).
Fig. 3: Properly Supported Disc Brake Caliper - Typical
6. Remove the disc brake caliper assembly (3) from the steering knuckle (1). Caliper assembly is removed by first rotating top of caliper assembly away from steering knuckle and then removing bottom of assembly out from under machined abutment on steering knuckle.
NOTE: Do not allow the brake caliper assembly to hang by the brake flex hose (2).
7. Support disc brake caliper assembly by using a wire hanger (4) and suspend it from the strut assembly (5).

Fig. 4: Strut To Steering Knuckle Attaching Bolts
8. Remove the brake rotor from the hub and bearing assembly.
9. Remove the steering knuckle-to-strut attachment bolts (2) from the steering knuckle (3).
10. Pull the steering knuckle from the strut clevis bracket (1).
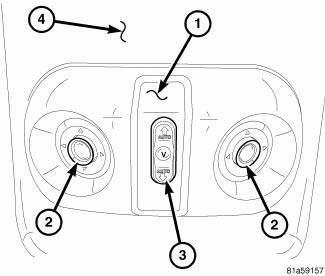
Fig. 5: Outer C/V Joint On Interconnecting Shaft
NOTE: Due to tight tolerances, the outer C/V joint might have to be forced apart from the bearing hub. To avoid damaging the axle half shaft threads during removal, install the hub nut (4) so that approximately half the threads are engaged on the shaft, and use a soft faced hammer (1) to tap the shaft (2) out of the hub.
NOTE: Care must be taken not to separate the inner C/V joint during this operation. Do not allow halfshaft to hang by inner C/V joint after removing outer C/V Joint from the hub/bearing assembly in steering knuckle, end of halfshaft must be supported.
11. Pull steering knuckle assembly down and away from the outer C/V joint of the half shaft assembly while pulling the joint out of the hub bearing.
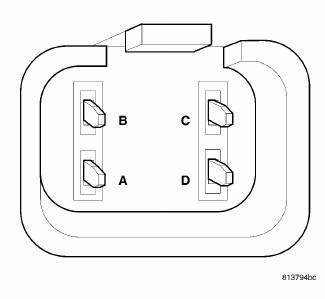
Fig. 6: Disengaging Inner Tripod Joint From Transaxle
NOTE: Transaxle fluid might leak when the half shaft is removed from the transaxle.
12. If equipped, remove the engine belly pan.
13. Support the outer end of the halfshaft assembly. Insert a pry bar (3) between inner tripod joint (1) and transaxle case (2). Pry against inner tripod joint, until tripod joint retaining snap-ring is disengaged from transaxle side gear.
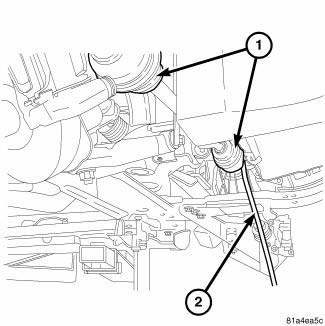
Fig. 7: View Of Manual Right Side Axle - 2.0L Gas
14. Pull the steering knuckle assembly down and away from the outer C/V joint of the half shaft assembly while pulling the halfshaft (1) out of the transmission.
15. Remove the half shaft.
 Removal
...
 With intermediate shaft
NOTE: Never grasp the halfshaft assembly by the inner or outer boots.
This can cause
damage to the boot, which will allow contaminants to enter the C/V joint.
NOTE: The inner tripod joints ...
See also:
Removal, Installation
REMOVAL
Fig. 298: Identifying Transmission Connectors
- SOLENOID PACK CONNECTOR
- INPUT SPEED SENSOR CONNECTOR
- OUTPUT SPEED SENSOR CONNECTOR
- TRANSMISSION RANGE SENSOR CONNECTOR
...
Removal
Fig. 431: Identifying Battery Cables
- BATTERY POSITIVE CABLE
- THERMO-WRAP
- BATTERY NEGATIVE CABLE
NOTE: If valve body is replaced or reconditioned, the PCM Quick Learn
Procedure
...
Description, Operation, Diagnosis and Testing
DESCRIPTION
Fig. 1: Accessory Switch Bank Module
Vehicles with the heated seat option can be visually identified by the two
heated seat switches (1) located in the
center stack of the instrumen ...
