Dodge Journey: Installation
1. Guide the trailing end of the parking brake cable along the inboard side of the axle trailing arm up to the rear brake caliper. Make sure the cable is routed between the brake line and the trailing arm.
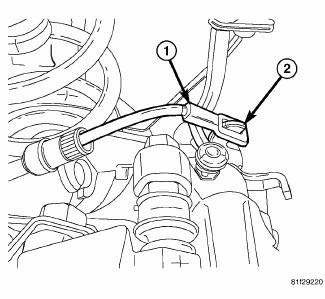
Fig. 216: PARKING BRAKE CABLE AT LEVER
2. Pull the parking brake cable strand (1) outward from the cable housing and hook it onto the caliper lever (2).
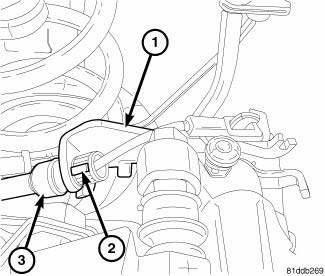
Fig. 217: PARKING BRAKE CABLE AT BRACKET
3. Push the excess cable strand back into the cable housing, then insert the cable housing (3) into the mounting bracket (1) until the retainer fingers (2) lock into place. Make sure both fingers are engaged preventing removal of the cable from the bracket.
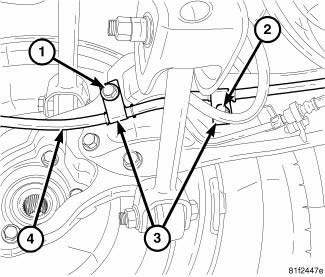
Fig. 218: CABLE AT LEFT TRAILING LINK
CAUTION: Before installing bolt (1) in the following step, it is especially important to clean the threads and apply Mopar Lock AND Seal Adhesive or equivalent.
4. If servicing the left rear cable, position the cable routing clamps (3) against the axle trailing link and:
- Install the upper mounting bolt (1) securing the trailing link (and cable routing clamp) to the knuckle. Tighten the mounting bolt to 60 N.m (44 ft. lbs.).
- Install the bolt (2) attaching the other cable routing clamp to the axle trailing link. Tighten the bolt to 28 N.m (21 ft. lbs.).
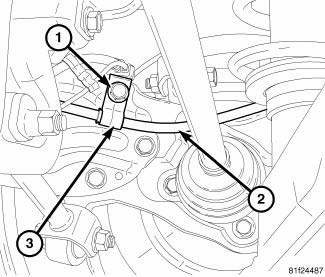
Fig. 219: CABLE AT RIGHT TRAILING LINK
CAUTION: Before installing bolt (1) in the following step, it is especially important to clean the threads and apply Mopar Lock AND Seal Adhesive or equivalent.
5. If servicing the right rear cable, position the cable routing clamps (3) against the axle trailing link and install the upper mounting bolt (1) securing the trailing link (and cable routing clamp) to the knuckle.
Tighten the mounting bolt to 60 N.m (44 ft. lbs.).
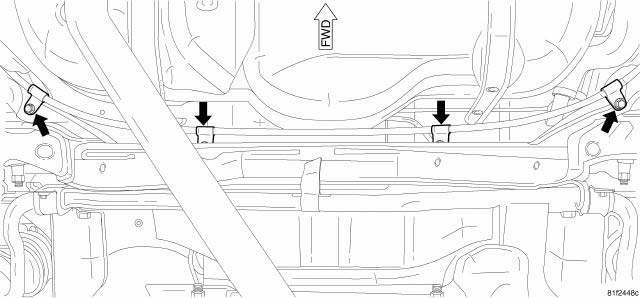
Fig. 220: RIGHT CABLE AT CROSSMEMBER
6. If servicing the right rear cable, route the cable over the rear axle (if equipped with AWD) along the front of the rear suspension crossmember. Position the four routing clamps on the rear crossmember and install the screws. Tighten the screws to 6 N.m (55 in. lbs.).
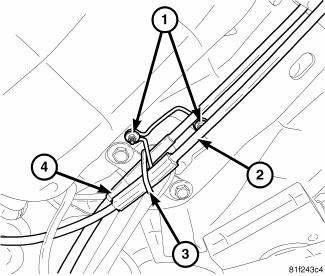
Fig. 221: PARKING BRAKE CABLE ROUTING LOOP
7. If servicing the left rear cable, place the routing loop (3) over the studs on the vehicle underbody near the trailing link forward mounting point and install the mounting nuts. Tighten the nuts to 6 N.m (55 in. lbs.).
8. Insert the right rear cable (2) through the lower loop of the cable routing loop (3).
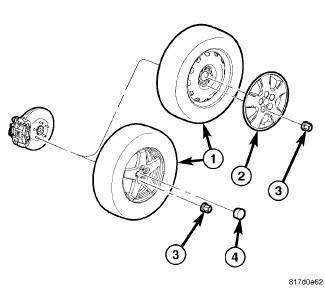
Fig. 222: TIRE AND WHEEL MOUNTING
9. Install tire and wheel assembly (1). Install and tighten wheel mounting nuts (3) to 135 N.m (100 ft. lbs.).
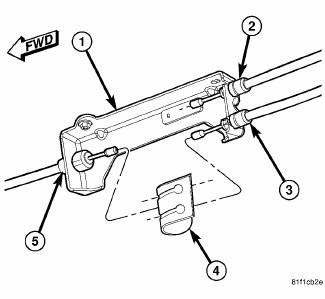
Fig. 223: PARKING BRAKE CABLE EQUALIZER
10. If servicing the left rear cable, pass the leading end of the left rear cable (2) through the upper hole in the intermediate bracket (1). Press the cable housing through the hole until the fingers on the retainer lock it into place.
11. If servicing a vehicle equipped with a foot lever:
- Connect the parking brake cable equalizer (4) to the three parking brake cables (2, 3, 5) and reset the cable tension.
- Lower the vehicle.
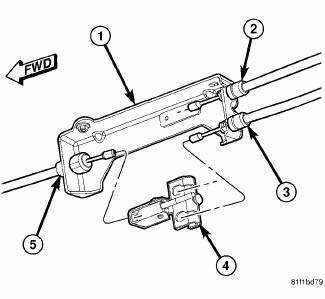
Fig. 224: CABLE EQUALIZER/TENSIONER
12. If servicing a vehicle equipped with a hand lever:
- Connect the parking brake cable equalizer/bent nail tensioner (4) to the three parking brake cables (2, 3, 5).
- Remove any slack from the parking brake cables by pushing the front cable strand forward into the housing until slack is removed.
- Lower the vehicle.
- Reset the hand lever cable tension and verify check operation of the parking brake.
13. Check operation of parking brakes.
 Removal
1. Release the parking brake.
2. Manually release the parking brake cable tension.
3. Raise and support the vehicle.
Fig. 206: TIRE AND WHEEL MOUNTING
4. Remove wheel mounting nuts (3), t ...
See also:
Lines, A/C underbody, extension
Description
Fig. 310: Underbody A/C Extension Lines Description
Models equipped with the rear heating-A/C system use metal lines attached to
the vehicle underbody to carry
refrigerant and engin ...
CD/DVD DISC MAINTENANCE
To keep a CD/DVD in good condition, take the following
precautions:
1. Handle the disc by its edge; avoid touching the
surface.
2. If the disc is stained, clean the surface with a soft cloth,
wip ...
Removal, Installation
REMOVAL
WARNING: Disable the airbag system before attempting any steering
wheel, steering
column, or instrument panel component diagnosis or service. Disconnect
and isolate the negat ...

