Dodge Journey: Installation
LEFT-HAND-DRIVE
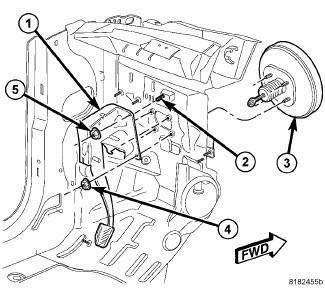
Fig. 140: PEDAL AND BOOSTER MOUNTING - LHD
1. Carefully install the brake pedal and bracket assembly (1) in the vehicle lining up the bracket with the power brake booster mounting studs and the stud (2) on the dash panel.
2. Install the four nuts (4) attaching the brake pedal (1) (and power brake booster) to the dash panel. Do not tighten the nuts at this time.
3. Install the remaining nut (5) attaching the brake pedal (1) to the dash panel. To tighten this nut (and the other four from the preceding step), refer to the following step.
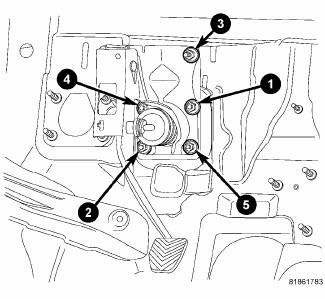
Fig. 141: MOUNTING NUT TORQUE SEQUENCE
CAUTION: Because of power brake booster design, it is very important to tighten the mounting nuts in the proper sequence.
4. Tighten the brake pedal/booster mounting nuts in the proper sequence to 23 N.m (17 ft. lbs.).
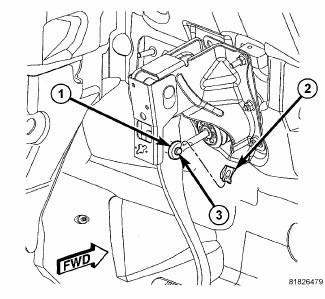
Fig. 142: BRAKE PEDAL CLIP
5. Using Mopar Lubriplate, or an equivalent, coat the surface of the brake pedal pin (3) where it contacts the brake booster push rod (1).
6. Install the power brake booster push rod (1) on the pin (3) mounted on the side of the brake pedal. Install a NEW retaining clip (2) on the end of the pin. Do not reuse the old clip.
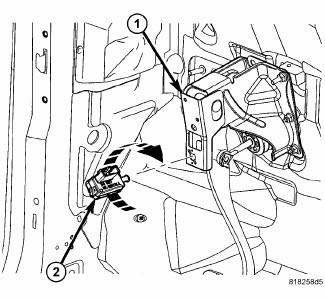
Fig. 143: STOP LAMP SWITCH AND PEDAL CLIP
CAUTION: Do not reuse the original stop lamp switch on vehicles built prior to July 21, 2008. Anytime a switch has been removed or its position compromised, a new switch must be installed and adjusted. Do not attempt to readjust the switch. The original brake lamp switch can be reused and adjusted on vehicles built on or after July 21, 2008.
7. Install and adjust a NEW stop lamp switch (2) in the brake pedal bracket (1) on vehicle built prior to July 21, 2008. The original brake lamp switch can be reused on vehicles built on or after July 21, 2008.

Fig. 144: STOP LAMP SWITCH WIRING CONNECTOR
8. If not already performed, connect the wiring connector (4) at the stop lamp switch (3).
9. Attach the stop lamp switch wiring routing clip (1) at the brake pedal bracket (2).
10. If equipped, install the silencer pad below the instrument panel.
11. Connect the battery negative cable to its post on the battery.
12. Check the stop lamps to verify they are operating properly and not staying on when the pedal is in the released position.
13. Road test the vehicle to ensure proper operation of the brakes.
RIGHT-HAND-DRIVE
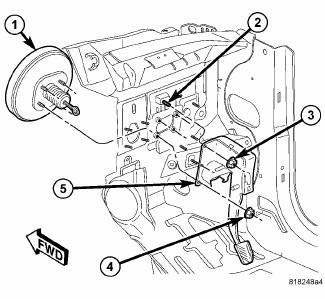
Fig. 145: PEDAL AND BOOSTER MOUNTING - RHD
1. Carefully install the brake pedal and bracket assembly (5) in the vehicle lining up the bracket with the power brake booster mounting studs and the stud (2) on the dash panel.
2. Install the four nuts (4) attaching the brake pedal (5) (and power brake booster) to the dash panel. Do not tighten the nuts at this time.
3. Install the remaining nut (3) attaching the brake pedal (5) to the dash panel. To tighten these nuts, refer to the following step.
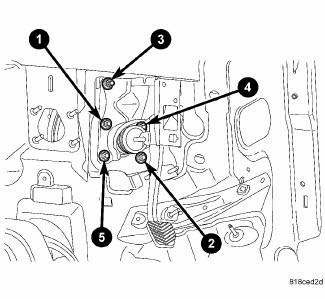
Fig. 146: MOUNTING NUT TORQUE SEQUENCE - RHD
CAUTION: Because of power brake booster design, it is very important to tighten the mounting nuts in the proper sequence.
4. Tighten the brake pedal/booster mounting nuts in the proper sequence to 23 N.m (17 ft. lbs.).
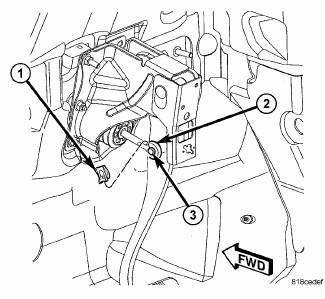
Fig. 147: BRAKE PEDAL CLIP - RHD
5. Using Mopar Lubriplate, or an equivalent, coat the surface of the brake pedal pin (3) where it contacts the brake booster push rod.
6. Install the power brake booster push rod (2) on the pin (3) mounted on the side of the brake pedal. Install a NEW retaining clip (1) on the end of the pin. Do not reuse the old clip.

Fig. 148: STOP LAMP SWITCH AND PEDAL CLIP
CAUTION: Do not reuse the original stop lamp switch on vehicles built prior to July 21, 2008. Anytime a switch has been removed or its position compromised, a new switch must be installed and adjusted. Do not attempt to readjust the switch. The original brake lamp switch can be reused and adjusted on vehicles built on or after July 21, 2008.
7. Install and adjust a NEW stop lamp switch (2) in the brake pedal bracket (1) on vehicle built prior to July 21, 2008. The original brake lamp switch can be reused on vehicles built on or after July 21, 2008.

Fig. 149: STOP LAMP SWITCH WIRING CONNECTOR
8. If not already performed, connect the wiring connector (4) at the stop lamp switch (3).
9. Attach the stop lamp switch wiring routing clip (1) at the brake pedal bracket (2).
10. If equipped, install the silencer pad below the instrument panel.
11. Connect the battery negative cable to its post on the battery.
12. Check the stop lamps to verify they are operating properly and not staying on when the pedal is in the released position.
13. Road test the vehicle to ensure proper operation of the brakes.
 Removal
LEFT-HAND-DRIVE
1. Disconnect and isolate the battery negative cable from its post on the
battery.
2. If equipped, remove the silencer pad below the steering column opening cover.
Fig. 132: S ...
 Reservoir, brake master cylinder
Removal
CAUTION: If at any time the master cylinder is loosened or
removed, you must
perform the master cylinder installation procedure to ensure that the
seal
(o-ring) is still ...
See also:
Operation
SYSTEM
The Powertrain Control Module (PCM) monitors many different circuits in the
fuel injection, ignition, emission
and engine systems. If the PCM senses a problem with a monitored circuit often ...
Air cleaner
REMOVAL
Fig. 85: Air Filter Housing Clips
1. Disengage the air filter housing clips (1).
2. Slide the air filter housing cover (2) forward slightly to disengage tabs
from the bottom of the ai ...
Disassembly
Fig. 241: Tapping Down Reverse Clutch Reaction Plate
- #4 THRUST PLATE (SELECT)
- TAP DOWN REVERSE CLUTCH REACTION PLATE TO REMOVE OR INSTALL SNAP RING
- INPUT SHAFT CLUTCHES RETAINER ASSEMB ...
