Dodge Journey: Removal
1. Raise and support vehicle.
NOTE: Perform 2 through 5 on each side of vehicle to complete pad set removal.

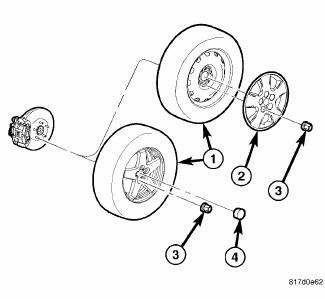
Fig. 124: TIRE AND WHEEL MOUNTING
2. Remove wheel mounting nuts (3), then tire and wheel assembly (1).

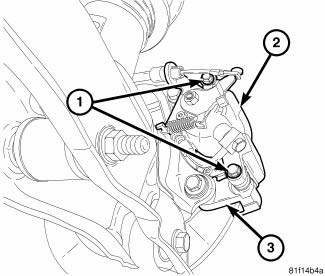
Fig. 125: REAR CALIPER MOUNTING
CAUTION: When removing or installing a caliper guide pin bolt, it is necessary to hold the guide pin stationary while turning the bolt. Hold the guide pin stationary using a wrench placed upon the pin's hex-shaped head.
3. Remove two caliper guide pin bolts (1).
4. Remove the disc brake caliper (2) from the disc brake adapter bracket (3) and hang it out of the way using wire or a bungee cord. Use care not to overextend the brake hose or parking brake cable when doing this.

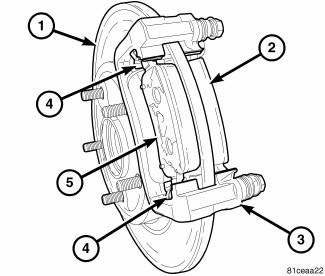
Fig. 126: REAR BRAKE PADS
5. Remove the brake pads (2, 5) from the caliper adapter bracket (3).
CLEANING
WARNING: Chrysler LLC does not manufacture any vehicles or replacement parts that contain asbestos. Aftermarket products may or may not contain asbestos. Refer to aftermarket product packaging for product information.
Whether the product contains asbestos or not, dust and dirt can accumulate on brake parts during normal use. Follow practices prescribed by appropriate regulations for the handling, processing and disposing of dust and debris.
INSPECTION
Visually inspect brake pads for uneven lining wear. Also inspect for excessive lining deterioration. Check the clearance between the tips of the wear indicators (if equipped) on the pads and the brake rotors.
If a visual inspection does not adequately determine the condition of the lining, a physical check will be necessary. To check the amount of lining wear, remove the disc brake pads from the vehicle.

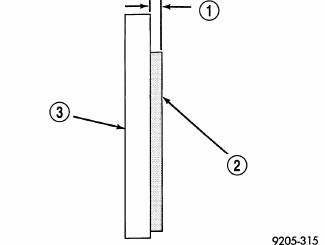
Fig. 127: Brake pad Friction Material Thickness Measurement
- - BRAKE SHOE ASSEMBLY FRICTION MATERIAL THICKNESS IS TO BE MEASURED AT THE THINNEST POINT.
- - BRAKE Shoe ASSEMBLY FRICTION MATERIAL
- - BRAKE SHOE ASSEMBLY BACKING PLATE
Measure brake pad minimum thickness (1). Brake pads must be replaced when usable material on a brake pad lining (2) measured at its thinnest point measures one millimeter (0.04 inches) or less.
If a brake pad fails inspection, replace both disc brake pads (inboard and outboard) at each caliper. It is also necessary to replace the pads on the opposite side of the vehicle as well as the pads failing inspection to maintain proper braking characteristics.
If the brake pad assemblies do not require replacement, be sure to reinstall the brake pads in the original position they were removed from.
NOTE: It is important to inspect both front and rear brake pads during the same inspection.
 Installation
NOTE: Perform 1 through 6 on each side of vehicle to complete pad set
installation,
then proceed to 7.
CAUTION: Anytime the brake rotor or brake pads are being replaced,
the rear cal ...
See also:
Converter, catalytic
DESCRIPTION
WARNING: The normal operating temperature of the exhaust system is
very high.
Therefore, never work around or attempt to service any part of the
exhaust system until it ...
Description, Operation
DESCRIPTION
Several combinations of radio receivers and speaker systems are offered. The
audio system uses an ignition
switched source of battery current so that the system will only operate when ...
Schematics and diagrams
40/41TE - WITH VARIABLE LINE PRESSURE
Fig. 181: Identifying Line Pressure - Park & Neutral
Fig. 182: Identifying Line Pressure - Reverse
Fig. 183: Identifying Line Pressure - First Gear ( ...

